How To
How To Replace Your Failing SSD In Under An Hour Without Losing Any Data

Over the weekend, I rebooted my PC (Dell XPS 8930), and the BIOS flashed the following error message on my screen: “Dell SupportAssist has detected a failing component on your system that requires immediate attention”. After plugging in the information it provided, it basically told me that a hard drive failure was imminent. FML!
Back in the day, if you turned on the computer and hear your hard drive clicking, you knew you were SOL. But this computer came with an SSD (solid state drive), and they apparently have a S.M.A.R.T. monitoring feature that detects and reports various indicators of drive reliability with the intent of anticipating imminent hardware failures. That’s what triggered the warning. Needless to say, I didn’t want to sit on this, as my drive could give out at any moment.
With no time to lose, I logged into my system and started backing up my most important files to my external hard drive as fast as possible, as I had no idea how much time I had, nor did I remember when I did my last backup. With hundreds of thousands of files on my PC, this took a fair amount of time, basically monopolizing my weekend. Thankfully, I had just picked up a Seagate 10TB External Hard Drive in December, so I had plenty of space to work with.
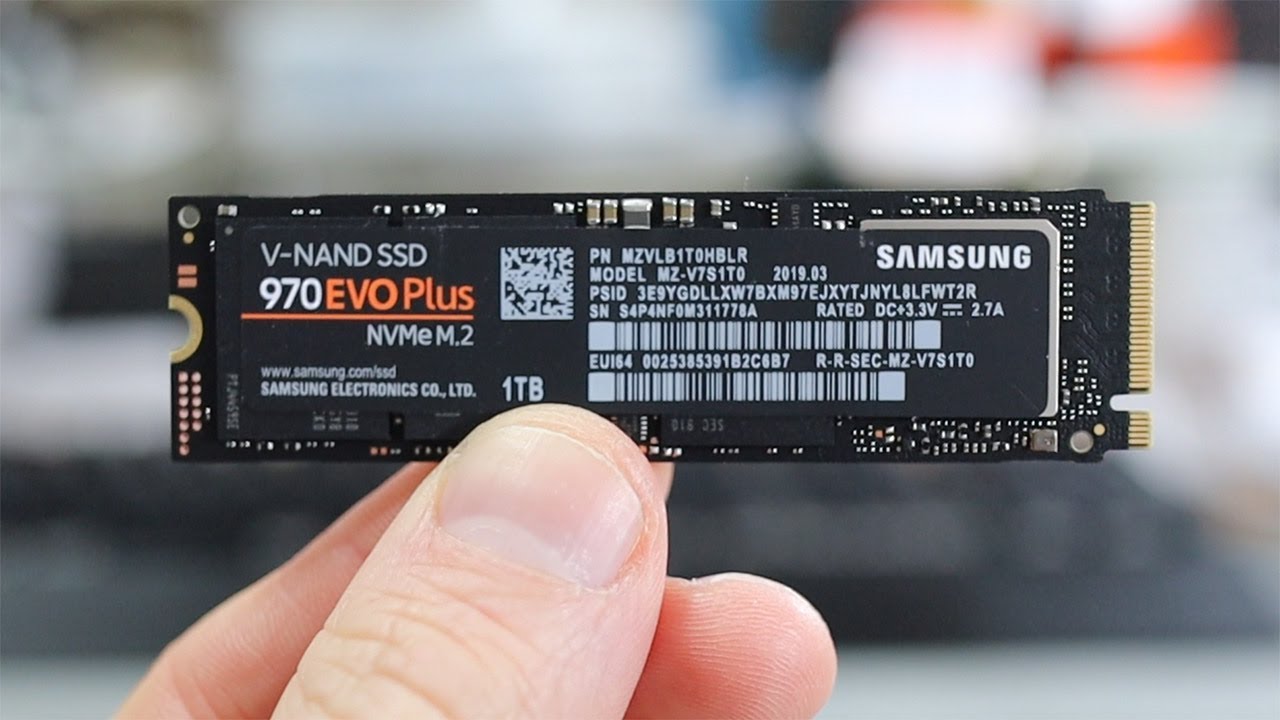
Next, I had to buy a new SSD. Using Device Manager, I was able to figure out that my current drive was a 256GB Toshiba M.2 2280 PCI Express 3.0 x4 NVMe SSD. That was helpful, as there are a number of different types of SSDs, and I had been looking at SATA ones during my initial search. While my computer would theoretically support a SATA SSD, it made more sense to go with an NVMe drive, as they’re significantly faster. I ended up buying a Samsung 970 EVO Plus (500GB), which had great reviews, and its a steal at just $79.99.
Then came the hard part, trying to figuring out what to do next. In the past, I would simply buy a new drive, re-install Windows and all of my applications, and then restore any personal files and such. Some people like going this route because everything is “fresh”. On the flip side, any customizations you made are gone, you run into issues with drivers, licenses, lost passwords, etc. The last time I did this, it took me a good week before things were back to normal.
I didn’t want to go through that headache again, so I decided to see if I could clone my existing drive, something that we used to do when I worked on a workstation deployment project years ago. Since everyone had identical setups, we’d simply clone one hard drive over and over again, making the process that much easier. Back then (1998), we used a tool called Ghost.
As it turns out, there are quite a few options to choose from, many which are free. After doing quite a bit of research, it seemed like Macrium Reflect 7 was the obvious choice. It’s free, and this YouTube video they put out showed me exactly how to do it, even accounting for larger drives (like mine) and how to capture that extra space. If you buy a Samsung SSD, you can also download their Samsung Data Migration Software for free, but Macrium just seemed easier.
But there was one hurdle left. My computer’s motherboard only had a single M.2 NVMe slot, so I’d need an external M.2 NVMe enclosure that I could place my new SSD into in order for the cloning software to see both drives simultaneously. This MOKiN M.2 NVME SSD Enclosure is exactly what I was looking for, allowing me to place my new SSD drive in the enclosure, and then connect it to my PC via USB. Yeah, it was $22 for something that I’ll probably never use again, but it was worth it for the time it ended up saving me.
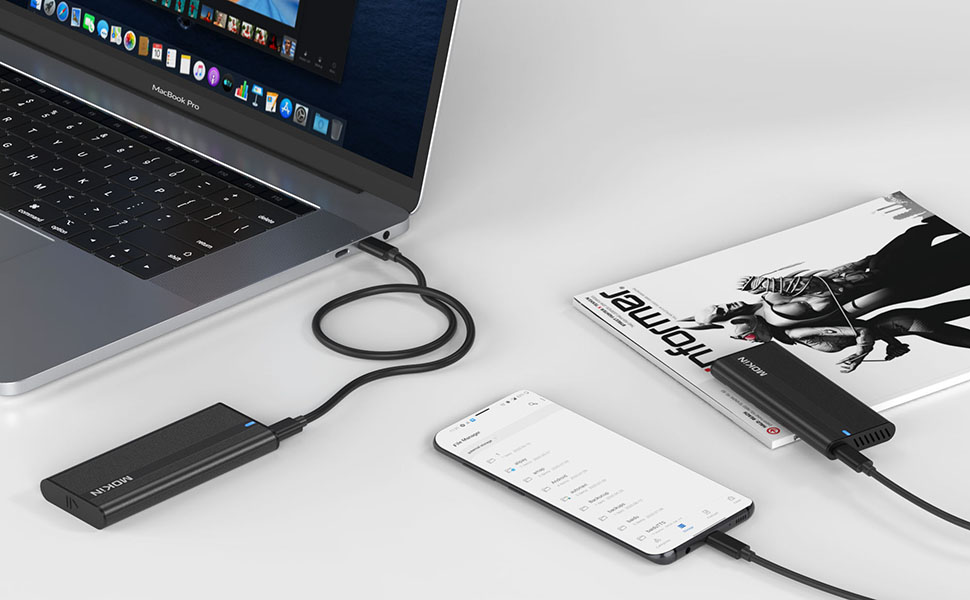
When everything arrived, I quickly inserted the Samsung SSD drive into the MOKiN enclosure, making sure to use the included rubber peg to keep it in place, and then I inserted it into a USB 3.0 port. I used Disk Management to make sure that the new drive was being recognized. Once confirmed, I fired up Macrium Reflect 7, followed the directions from the YouTube video above, and moved the 6 partitions to the new drive. I wasn’t sure how long it would take, but it was able to clone roughly 190GB of stuff in about 30 minutes!
The last step was to remove the old SSD drive from my computer, replacing it with the freshly cloned SSD drive. I pulled up the Dell XPS 8930 service manual online to see how to open the case (since everything on their computers is unique), and it was super easy. Removing the old drive involves removing the single screw holding the SSD drive in place so you can pull it out. Then you put the new drive in, replace the screw (which is a bitch to do since it’s so small), and once secure, just close up the case, plug everything back in, and cross your fingers.
Upon firing up my computer, I went into the BIOS to make sure that it saw the new hard drive), and then let it boot into Windows 10. Everything went off without a hitch, and all of my stuff was there as before, but with an extra 250GB to space since I went with the larger drive. Total time spent from start to finish was just under an hour. I honestly expected this whole process to take a good 2-3 hours, so I was pleasantly surprised.

Just for shits and giggles, I decided to run CrystalDiskMark’s disk benchmark software and see what kind of numbers this new drive would return. As you can see from the results above, it’s a damn quick drive, and it was definitely the right choice going with this over a SATA3 SSD drive, which is limited to read/write speeds of 550MB/second.
I didn’t have a chance to run this test on my old drive (nor did I want to risk it, since the drive was already on its way out), but considering the old drive was 2.5 years old, this one is likely a bit faster. Still, when it comes to SSD upgrades, the speed differences isn’t nearly as noticeable as when going from a traditional hard drive to an SSD.
Hopefully this posts can help anyone that’s facing a similar situation and doesn’t know where to start. I’ll admit, this whole ordeal was a little daunting to me at first, as SSDs are pretty new to me. But thankfully there was plenty of information on the web to help me figure things out. And lesson learned, I’ll be scheduling weekly backup images from now on so that I’m never in a precarious situation like this again!


Magic Mind Sleep Review: Science-Backed Shots That Help You Sleep

TAG Heuer Monaco Speed 12: The Watch That Runs Like A V12 Engine

2027 Subaru BRZ vs Toyota GR86: Is The Subaru Worth The Price Premium?

2026 Toyota GRMN Corolla Is The Most Extreme Hot Hatch They Ever Built

2027 BMW M2 Finally Gets AWD, Making It The Ultimate Daily Driver

Fallout S2 4K UHD Steelbook Review: The Wasteland Never Looked This Good

Krispy Kreme Unveils Epic ‘Masters Of The Universe’ Doughnut Collection

Father’s Day Gifts That Are Guaranteed To Make His Day

Miata Fans, Meet Zinc Green: Mazda’s Stunning New Color For The MX-5

$285,000 Rezvani Fortress Tactical Super Truck Makes Everything Else Look Soft

Watch The Fast And Furious Trailer For ‘Hobbs & Shaw’

A Dance-Off For The Ages Broke Out At Monday Night’s 76ers Game

Netflix Drops ‘Black Mirror: Bandersnatch’ Trailer Ahead Of Release Tomorrow

Former NASA Engineer Gets Revenge On Package Thief With Glitter Bomb

Kim
April 10, 2024 at 1:47 pm
Thanks for the article! I had the same issue with my 8930, but instead of using a third party cloning software, I used the Dell SupportAssist OS Recovery – it was already installed so no extra software to install, had had clear instructions. Took me longer than an hour – I dropped that little screw that holds the SSD in place, and it took me almost an hour to find it!
Sujeet Patel
April 10, 2024 at 1:56 pm
Good call on the Dell SupportAssist OS Recovery, I didn’t even think of that. And yes, that little screw was the bane of my existence, I dropped it so many times!